
FME 2022.1


By Garrett Cronin, Senior Account Manager IMGS
I was fortunate enough to be able to travel to this year’s Safe Software Partner Summit in Vancouver. The annual Safe Software Partner Summit is the largest meeting of Safe Software staff and partners from around the world. As per previous years, it was hosted in the beautiful Convention Centre in Downtown Vancouver. The venue boasts breath-taking views of the bay and is flanked by highrise buildings.

…
![]()

Author: Ciara Beddy, IMGS Senior GIS Engineer
Welcome to part two of Time Saving Tips in FME!
Using FME daily means you pick up on tips and tricks to make your daily tasks run quickly, smoothly and generally just make your FME life a bit easier. This blog is a follow up to last month’s time savings tips part 1.
Inspecting your data is a key part of any workspace you develop, with every change you make its good practice to check your output. So it stands to reason FME has a number of tools available to you, all you need to do is use them.
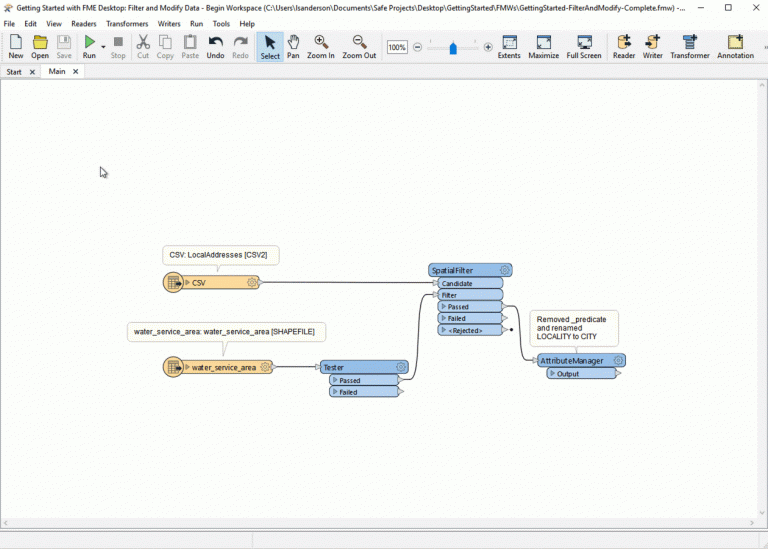
Do you ever run your workspace, wait for it to finish only to find it’s taken a wrong turn somewhere? Now you need to find out where things went amiss, run with full inspection is the solution for you. This setting will cache the data at each transformer link. Each cache can then be shown in the Data inspector by right clicking on the count.

This feature is great for debugging, no need to keep adding inspectors to source the issue, but don’t forget to turn off this functionality when you are done as it slows down performance and takes longer to run than a normal translation.
 When you are still in a testing phase then use “Redirect to Inspection Application”. This means you don’t alter your destination dataset and your output goes directly to the Inspector. You can run your process as many times as you want until you get it just right, the data is never written until you turn off this option. Especially important when you are making edit within a database and you only have one chance to get it right.
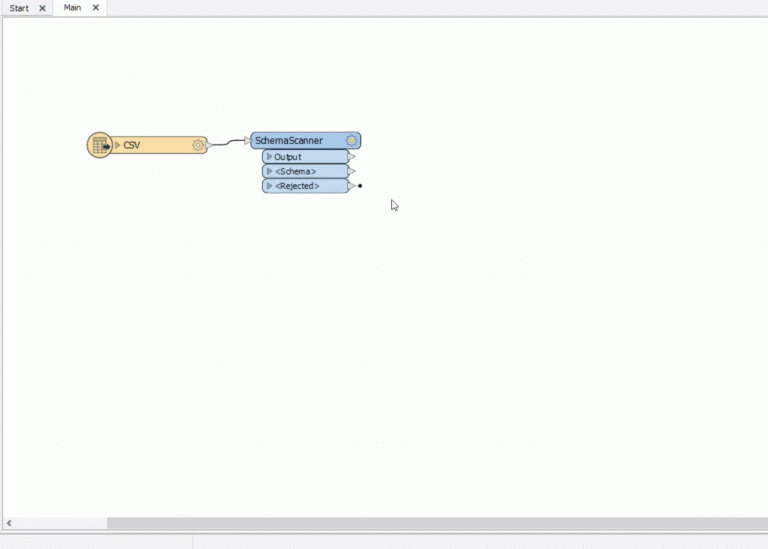
Your readers and writers now allow you to inspect your data with ease, right click on any Reader/Writer to use the inspection button or open containing folder. No excuses for not examining your output it’s easy!

The terminator transformer stops a translation when it detects non-valid situations or input data conditions that should not exist.

This is to stop the output of data which may impact your results, for example you could filter the data’s geometry and terminate if you find points in a dataset you expected to be linear. When a feature enters this transformer, the translation immediately stops and an error message displays to notify you that the data conditions are not expected.
To redirect the Terminator data to an Inspector instead of stopping the translation, you can set this option in the Workspace Properties in the Navigator. This allows you to view the unexpected data during development of your workspace and then you can switch off and reverts back to terminating the translation when expected conditions are met.

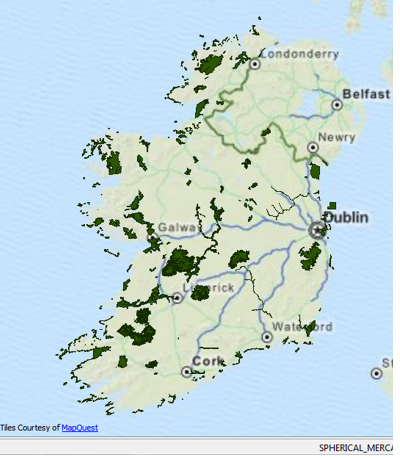
Once you are inspecting the data its quite useful to compare to a background map, don’t forget the Data Inspector now provides this functionality under Tools>Options>background maps.
You have a number of options ranging from open source mapping like open street map to the ability to connect to your own AGOL Map Service or Web Map Service. But remember your data will be reprojected to display in the coordinate system of the background map. So don’t get confused like I do….everytime! The actual coordinate system is always specified within the feature information.
Sometimes you can add a file with many layers like a .dgn or Geodatabase. Nothing gives you a bigger headache than having to reconnect all those layers to your writers, particularly when they are located the far side of the canvas. The Feature Type Connections window, found under View > Windows allows you to connect readers to writers with ease. I don’t use it often but when the need occurs it’s a great time saver.

Data Testing
The most popular transformer the Tester is much more than what it seems. You should have noticed by now it has received an update in the last few releases. If not, then pay attention as this can be a huge time saver when performing data quality checks. There are now Operators to filter data on such as Attribute is Null or Empty. New to 2016 is the operator “Attribute has a value”. This means that without knowing all the possibilities of how the attribute could not have a value we only need to check if it contains a value in order to extract all those missing records.

FME Options
Finally don’t forget you always have options! It’s important to customize your workspaces to your own needs so take 2 minutes to check out your options under the Tools Menu > FME Options. Here you can create a toolbar to your own specifications.

As well as control how your workbench functions, default paths, database connections and how your translation is run. There are plenty of choices here so they are worth reviewing.

Thanks for reading! Keep an eye here for next month’s blog.
Author: Ciara Beddy, IMGS Senior GIS Engineer
Welcome to part one of Time Saving Tips in FME!
Using FME daily means you pick up on tips and tricks to make your daily tasks run quickly, smoothly and generally just make your FME life a bit easier. This blog has been a long time coming, for the last year I have diligently kept note of some of the tools I use in Desktop that save time and because it’s nice to share I am departing these tips to you.
FME Functions
Functions may seem complex as they allow you to delve into the heart of FME’s core and fly solo so to speak. Using them means you are now stepping out on your own and calling functions that are in use in many of the transformers and that seems a bit daunting.
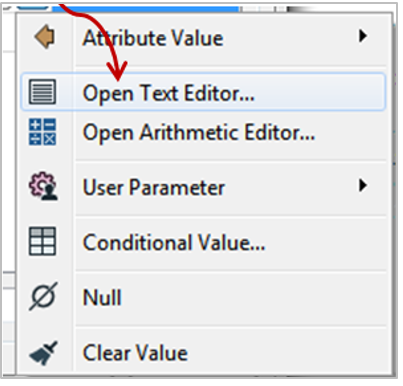
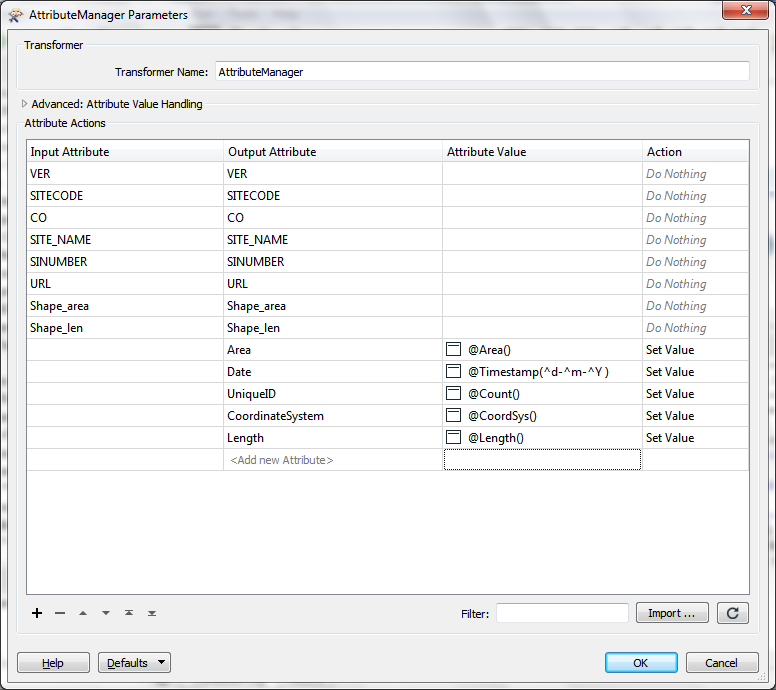
But this really is a smart move on your behalf, by using Feature Functions you can build processing directly into your attribute creation and save yourself the effort of placing multiple transformers. Really you can do A LOT with the text editor in FME, use it to build your queries and send them directly to the engine yourself instead of relying on transformers. When you use FME Functions as part of your attribute manager or attribute creator each resulting value is output as an attribute.
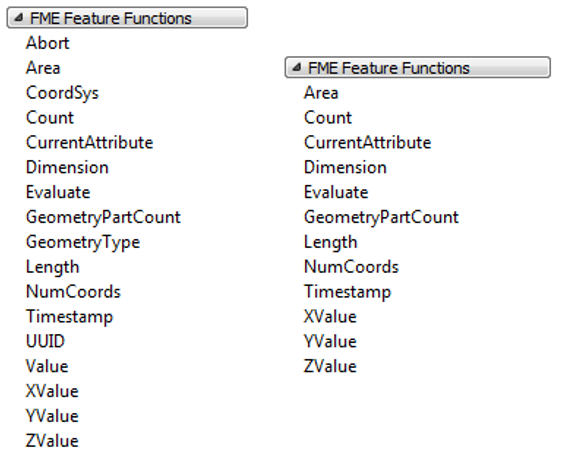
For example, @Area function calculates the area of a polygonal feature eliminating the need for the AreaCalculator. The @Count provides a mechanism for generating unique numbers for features during a translation eliminating the Counter. @Timestamp returns the current time and date, so you guessed it no need for a Timestamper.
Here are some of the common FME Functions I use in my workspaces, why don’t you try them out next time and see how simple it is to develop your own results without the use of multiple transformers.
Also for those experienced FME users out there did you know you can copy and paste a transformer into an open Text Editor and review the content, this allows you to see what really is at work inside the transformers you use.
Templates
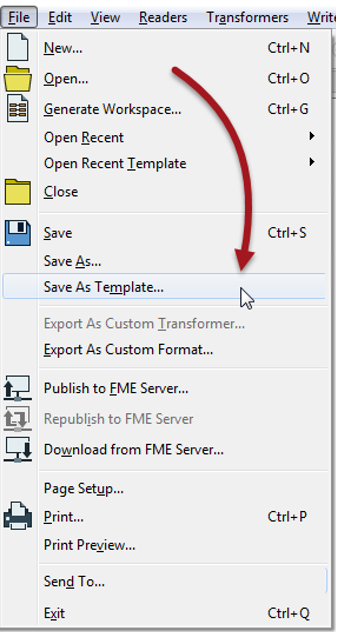 The ability to save workspaces as templates was added in 2011 though it still isn’t as widely used as I would like! A template is basically a saved workspace, with the inclusion of the data required to run. Using a template means you can bundle everything together and provide to another user….very handy for sharing workspaces with your colleagues.
These templates are given the extension .fmwt, using the template is very simple just open it in Workbench. If data was included in the template file then it will be extracted, stored to a temporary location and the workspace paths updated automatically making it ready to just hit run.
There are many possibilities with templates, they can be great to give out to other FME users as predefined translations. Or when looking for support from the team at IMGS if you provide us with a template you will certainly rise of the top of our to-do list and receive quicker solutions!
While on the subject of templates, if you are reading data from a database and the end user of the template does not have access to this data source then it’s time to introduce a recorder transformer.
The recorder is a nifty little transformer that saves a copy of all the features that enter it and writes into a FME Feature Store file. It’s really simple to use;
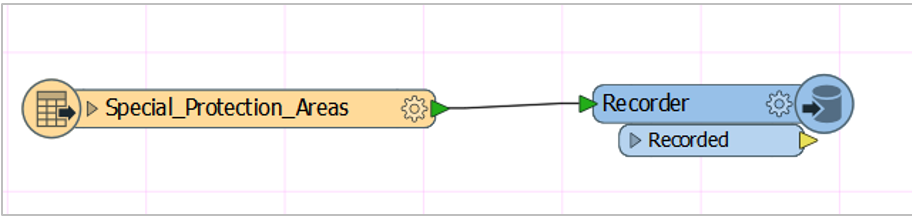
Now you can send a copy of your workspace and the FFS file. The end user can then add a Player transformer to your workspace and play back your recording – as if they were reading directly from your database. Everyone wins!
The Fanout
Most people probably know everything they need to know about the data fanout, it has been around a long time. But when it comes to listing features that save you time and effort I have to include the fanout. This is a way you can split your output data into separate layers/files based upon an attribute value.
It’s easy to set, just go to the writer properties right click and pick an attribute value. So your data output will be divided on the fly as it writes to your destination.

For example, I want to create a set of contours from my LIDAR dataset. But I want to have a separate output file for every elevation. If I set the output to fanout by the value of the elevation my results will be quite different.
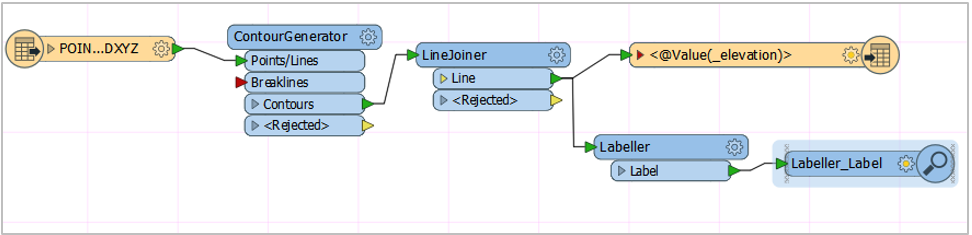
Instead of one file containing all contours your destination output will now contain multiple files one for each elevation level.


Shortcuts
People always say there are no shortcuts in life, well that’s not quite true. Here are some custom keyboard shortcuts which I promise will make your life easier, no risk involved!
| Save | Ctrl+s |
| Add New Bookmark | Ctrl+b |
| Zoom In | Ctrl++ |
| Zoom Out | Ctrl+- |
| Zoom to 100% | Ctrl+0 |
| Add Reader | Ctrl+Alt+r |
| Add Writer | Ctrl+Alt+w |
| Run Workspace | F5 |
| Search Workspace | F3 |
Another one of my favourites is the quick change from zoom in to select. Try it yourself, Zoom in and right click this will resets the cursor back to the select function. It’s the simple things in life.
Stay tuned for the follow up part two blog of Time Saving Tips in FME which will be published next month.
Author: Ciara Beddy, IMGS Senior GIS Engineer
For a new user looking at FME’s hundreds of available transformers, many with some interesting and unusual names, locating the transformer you need to get the job done can often feel like a difficult or daunting task.As an FME professional and Trainer I often get told in panic “I don’t think I will know what Transformer to use, there are so many!!” and that is true. In reality you can still be a proficient user of FME without knowing the ins and outs of every single Transformer. That is, if you arm yourself with the most useful ones!
Transformer knowledge comes down to experience. The more workspaces you create and projects you complete the larger your catalogue of Transformers becomes. To get new users started I would like to share with you a list of some of the unsung heroes of the transformer world, these are some of the tools I really couldn’t live without.
I am most often asked about how to quickly move spatial data between different coordinate systems. The answer is very simple, use the Reprojector. FME’s coordinate reprojection capabilities solve the common requirement to reproject data accurately and seamlessly. All you are required to do is place the transformer somewhere within your workflow.

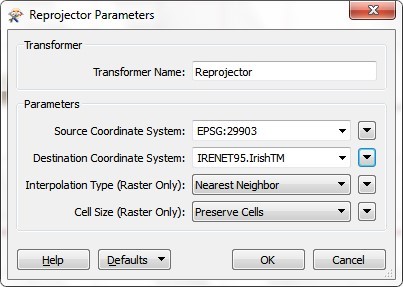
This transformer works on both raster and vector data, It provides the option to reproject data with a library of over 5000 coordinate reference systems. This gives you the ability to reproject data with the click of a button eliminating all those coordinate system headaches you face as a spatial data user.
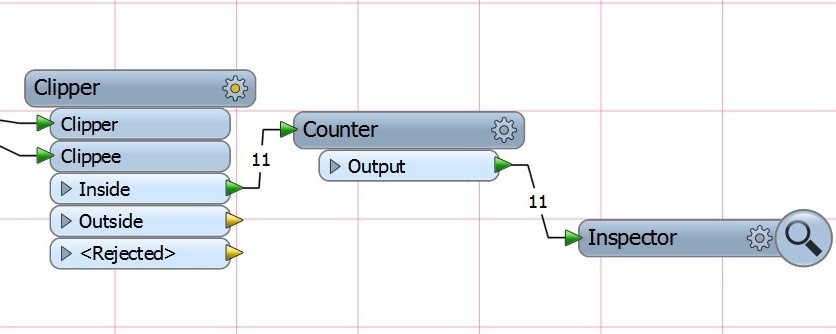
The Clipper is an excellent transformer for creating datasets that are relevant to your needs. Often users have national datasets containing more data than they actually require. The Clipper takes a number of clip boundaries and the number of features to be clipped and splits the data into features inside the boundary and features outside the boundary.
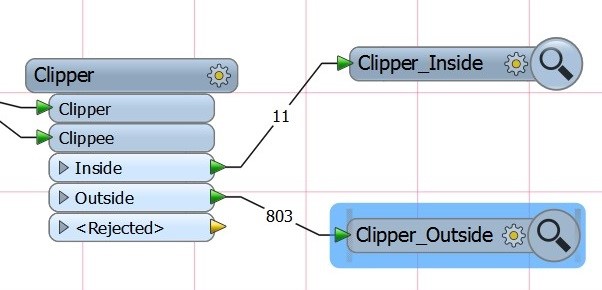

As the output is split into these two possible groups the Clipper allows you to keep the data relevant to your needs while disregarding the data that falls outside your defined boundaries. It is a great way of cleansing your datasets to only contain the data you will use, meaning any further analysis on these datasets are correct and more meaningful to your area of interest.
If you ever come across the need to provide a unique ID to the data running through your workspace than the Counter is the most simple way to achieve this. This transformer adds a numeric attribute to your features by assigning each feature an incremented value as it counts the features passing through.
 You can also specify if this counter sequence is unique throughout the whole workspace by using the same sequence on multiple counter transformers or using a unique sequence to that single counter. This transformer means you can create unique values without using any complex expressions, calculators or calling database sequences.
Another key quality control task it to check your data for duplicates, sometimes no matter how ‘perfect’ you think your data is, an unwanted duplicate can creep in during a processing task. FME gives you the ability to ensure that your data is clean by eliminating all those duplicate objects so only one remains. The answer comes in the form of the appropriately name DuplicateRemover. This transformer allows you to select one or multiple key attribute values that you require to be unique. Any key attribute value that has already been encountered in the DuplicateRemover is sent to a separate port labelled as a duplicate.

Allowing you to maintain the data stream coming from the unique port, giving you confidence in the quality of your output data.
Lastly, users are often tasked with the requirement to provide labels with their output data. There are a number of options in FME for labelling the most basic being the LabelPointReplacer. This transformer enables you to quickly configure labels and rules that will dictate how labels appear.
This transformer replaces the geometry of the coming feature with a label point while also giving you a number of options to define the label value.
If the feature was already a point, it is turned into a text feature at that location.


The LabelPointReplacer removes the hassle of creating labels for your spatial data and should be your first stop when tackling label requirements.
These are some of the key transformers I regularly use when tackling data problems. Hopefully it will give new users a head start on which of the transformers they may want to try out in the future. But don’t forget if you are ever in doubt or lost on what is the transformer for the job;


Also help is always at hand just contact us at support@imgs.ie for FME related queries we are happy to point you in the right direction when you are lost in a maze of Transformer options.